Looking for something specific?

Tuesday, August 21, 2012

Save the Date!

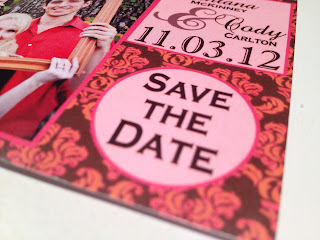
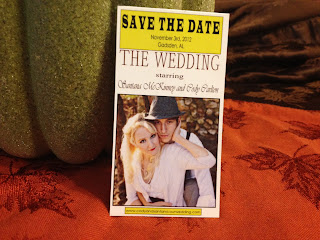
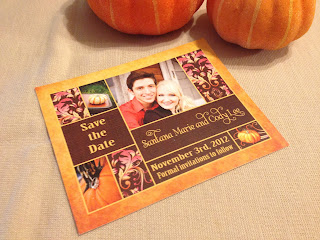
Well, after months and months of slaving over these designs, our Save the Dates are finally ready! Now, I know what you're thinking. "Why in the world did it take months and months?" Well, a normal bride usually goes online, picks out the cards she likes, orders, receives, and then mails them out. I think by now, everyone knows that I am not a normal bride. I'm a complete DIY bride actually. So naturally, it wasn't a question of whether or not I would do my own Save the Dates.

I started off browsing through the Internet and waiting for any special design to pop out at me. My original intention was to just find something that I could replicate. I didn't see anything that I just fell in love with. So I decided to combine ideas from various designs that I liked. What I ended up with was 12 different designs! Sometimes when my creativity is lit, it doesn't just spark, it blazes!

So after matching design colors to the other colors I want in the wedding, these are the designs I came up with.


What do you think? Yes, I now have 12 designs to give away. How could I possibly choose just one? 
They are all so cute! Besides, who says you can only have one?

I'm very please with how they turned out. I'm even thinking about selling my designs on Etsy. 
After this wedding is over of course. ;)

So after the design process, I had them printed on Heavy Card stock at PostNet and Office Max for about .42 cents a sheet. 
Next, it was time to get them ready for delivery!


First, I made these adorable little burlap pouches for the cards that will be hand delivered. 
I got the idea from this picture on Pinterest.


And this is my version...


...without the tags on though. I bought a big roll of burlap from the garden section in Wal-Mart, cut out various sized squares, and hot glued the edges to card stock. The picture from Pinterest looked like they sewed the edges, but my thread was going right through it and fraying the edges. 
So I decided hot glue would work just as well. 


I then cut each card out with my Xacto paper cutter. 
This took around 2 hours to meticulously cut each card out straight and even. 


Once all the cards were cut out, I cut and hot glued small pieces of strip magnets to the back of each card. I really wanted each card to be a magnet, so that guests could place their cards on their refrigerators or other magnetic surfaces. 


The next step was to punch out all of the tags that I also designed. I chose six different fonts. Again, how could I choose just one? I used the EK Success Flourish Square punch from Hobby Lobby. 


I think they turned out well too. :)

All that was left was to glue the tags to the pouches. I realized that if I glued the tags to the burlap, that the glue would stick to the card stock. So I punched out some blank tags out of the same card stock used for the printed tags, inserted them center inside of the pouches, and glued the tags on the outside to the blank tags on the inside. (Excuse the lack of photos for this step. I randomly did this one night and didn't think to get out my camera). After hot gluing all of the tags to the pouches, I just slipped in a card that best fit each pouch and TA DA! The Save the Dates are now complete!


After 6 months of preparing these (yes, all of this was over a period of 6 MONTHS) my cards are now ready for delivery!


Not all of these will be hand delivered. Just most of them ;) 
I purchased some 'craft' envelopes at Hobby Lobby to mail out to our out-of-state guests. I'm too much of a cheapo to mail them all haha! Why would I spend more money on postage when I literally see these people every single day! I will, however, keep with tradition and mail all of my invites. (And it will kill me to do that! ha!)

Now all I have to do is get them out! 
According to my TheKnot timeline, I'm already 2 months behind on these. EEK!

*Photos used for cards were taken by our friends and fav photographers Brooke Bikneris (Brooke Bikneris Photography) and Lauryn Johnson (Olive Photos). Find them on Facebook!*

Thursday, July 5, 2012

Let the Games BEGIN!

Music Man poster.....DONE. New graphic for the CharACTers website....DONE. New CharACTers brochure.....DONE! I FINALLY have time to work on this wedding! And that's a good thing, considering I now have less than 4 months! :/

Well, my first order of business has been in the works for a few weeks actually. I wanted to "officially" ask my girls to be my Bridesmaids/Maid of Honor in a very special way. So, after some Pinterest research, I came up with this idea...

I found these little boxes at the Dollar Tree. I was happy to find plain, white favor boxes that didn't have those ugly, tacky 'wedding' symbols on them. 

Favor Boxes - Dollar Tree 12 for $1

I wanted to personalize the favor boxes with a lil' flair but also keep with my 'Rustic Elegance' theme (see the **Side Note below). This past Christmas, Santa brought me a new Martha Stewart Heat Tool. This thing is amazing!! My world of crafting has completely changed. So I thought, why not emboss? 

Martha Stewart Heat Tool - Michael's Craft Store. Embossing Pen - Hobby Lobby.

I bought an embossing pen and wrote the first name initial of each girl on the box. Sprinkled my magic gold embossing powder and TA DA! Embossed initials for each girl! I was so proud of these and very happy with the results.


I found a really cute Pinterest tutorial for twine flowers. Unfortunately, the tutorial didn't work out so well for me. So, I did what I normally do. I improvised! After about 20 mins of messing around with the twine and hot glue, I finally came up with these cute little twine flowers :)


I wanted to give the girls something edible, but not messy, and something that they would all like. I decided brownies were the way to go :) I cut the brownies so that they would fit nicely into the favor boxes.

Next were the Ring Pops! I thought it would be a cute take on the whole "proposal" thing. In this case, I'm "proposing" to my girls, asking them to be my Bridesmaids/Maid of Honor. I thought a Ring Pop would be appropriate. 


The final thing that I wanted to do was include a special note that would do the 'asking' for me. I found a really cute and sweet poem online and then designed the note. *Just a note: I've saved a ton of money so far designing all of my own stuff. I'm doing everything from these letters, to my Save The Dates (pics coming soon), to my invitations, to anything that has to be printed for the wedding itself. I'm pretty good at Illustrator, so why wouldn't I design everything myself?* These are the finished products....


And then came the assembly. I placed the brownies inside the box and stuck the ring pop into the brownie so that it would stand up as if it was in a ring box.


I then rolled up the poems and attached them, along with the twine flowers, to the little handle with extra twine. Bridesmaid Boxes complete!


My girls loved them! Some of them even cried after they read the poem. I was very excited to make these little gems and it only makes me even more excited about crafting the rest of the wedding! 


**Side Note**It's amazing to me how my wedding theme has evolved since Cody and I began thinking about getting married. Almost five years ago, when we decided that we were each other's soul mate, I started planning a "Fairy Tale" wedding. I was going to have castles, crystals, fairy dust, Cinderella's carriage, the whole nine yards. It was beginning to look more like a 5 year old's Birthday Party instead of a wedding. And then I realized my hopes and dreams for a Fall wedding wouldn't be very practical for a Fairy Tale wedding. Especially, when you think of the color schemes I was looking at. Pink and Silver? Not a good choice for warm, earthy tones that are normally sought after in the Fall. Atleast, it wouldn't work for me anyway. I then wanted a hot pink and bright orange scheme for my Fall wedding. But alas, I decided that those colors were a great choice for a Summer wedding, but not Fall. Next, I kind of went overboard with a straight up Fall theme. Pumpkins were going to be everywhere you turned! Then I took a step back and realized it looked too Halloween. And then I discovered "Rustic Elegance." Although most of my ideas have come from the wonders of Pinterest, I did come across a few Rustic weddings before even hearing about that joyous website. And here we are. My final and BEST decision. Rustic Elegance! Yes, I'm fully aware that the whole world is doing this theme too right now. It's the current "in-style." But I honestly think that this theme suits both Cody and I to a T! If you don't agree, just wait until the pictures come out. ;)***

Thursday, June 21, 2012

3 months and still going...

It's been 3 months since I've last blogged. 3 MONTHS!? Where have I been you say? Busy. That's all I ever am. I need a shirt that says something like "Hello, I'm Busy" or "...Busy...". Maybe I should change my name to Busy?

So, what have I actually been doing the past 3 months? Let's take a look...

I held auditions for MY first show

Went camping

Attended the midnight premiere of Hunger Games

Celebrated Easter with my man and family

Painted the Titanic

Booked our Honeymoon Cruise

Directed and completed my first show, Disney's Winnie the Pooh KIDS

Took the Dreamcatchers to Chattanooga for their first competition.
(They received Top First and Perfect Performance)

Completely redesigned the CharACTers website (a week long job)

Taught at the Arts Around the World Camp at the YMCA

Organized, Planned and finally made a trip to Disney for another Dreamcatchers performance!
 

Last but not least, I made over 15 cakes!


I couldn't find all the pictures of every cake I did. If I do, I'll be sure to post it :)

I now have some downtime after the Disney trip and the shows. I'm only doing the choreography for Music Man so that shouldn't be as much to do. I had said that this past week was going to be my "catch up" week. Meaning, I would do all the things I've been putting off for months this week. But what did I do? NOTHING! I sat on my booty all week. 
Actually, that's not entirely true. I did have to design and finish the new CharACTers brochure this week, which took up most of my life. I also had to make a wedding cake (the navy blue one above) and some cupcakes for the CharACTers Awards Ceremony (which is tomorrow night). 
Considering that for the past two weeks I've been getting up before 7am (not the norm for me), I thoroughly enjoyed sleeping until 12pm this week :)

But now, with only 135 days left until the wedding (insert screams here) I really need to get a jump on this wedding stuff. Next week's goals include 1) making dress appointments. 2) making florist appointments. 3) sending out save the dates. 4) line up the caterer(s). And finally 5) FIND A VENUE! I really don't know why that has been so hard? All I want is something I can make look 'rustic.' I have searched and searched and still cannot find my perfect venue, unless I want to pay out the booty! *Sigh* If I could just book a venue, then all my worries will come to s screeching halt. Well, atleast for now haha!

I also want to get back to my home projects. I would like to finish the laundry room, bathroom, kitchen and master bedroom. 

And then there's my Pinterest projects!! Oh how the list just goes on and on and on!!

Well, let's see how long it takes me to get this stuff done ;)

TTFN!